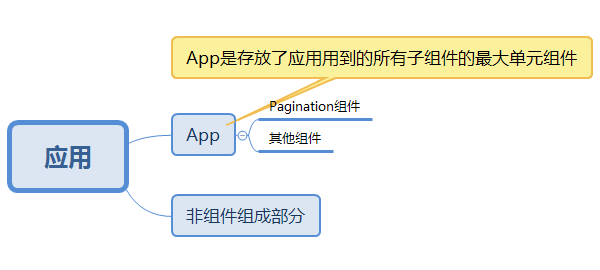
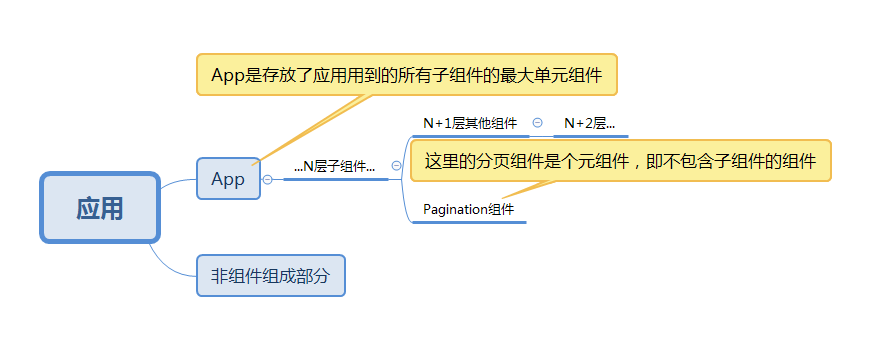
//pagination.vue bootstrap风格分页组件
//author: doterlin
//2016-12-16
<template>
<div class="pagination-wrap" v-cloak v-if="totalPage!=0">
<ul class="pagination">
<li :class="currentPage==1?'disabled':''"><a href="javascript:;" @click="turnToPage(1)">首页</a></li>
<li :class="currentPage==1?'disabled':''"><a @click="turnToPage(currentPage-1)" href="javascript:;">上一页</a></li>
<li><a href="javascript:;" @click="turnToPage(currentPage-3)" v-text="currentPage-3" v-if="currentPage-3>0"></a></li>
<li><a href="javascript:;" @click="turnToPage(currentPage-2)" v-text="currentPage-2" v-if="currentPage-2>0"></a></li>
<li><a href="javascript:;" @click="turnToPage(currentPage-1)" v-text="currentPage-1" v-if="currentPage-1>0"></a></li>
<li class="active"><a href="javascript:;" @click="turnToPage(currentPage)" v-text="currentPage">3</a></li>
<li><a href="javascript:;" @click="turnToPage(currentPage+1)" v-text="currentPage+1" v-if="currentPage+1<totalPage"></a></li>
<li><a href="javascript:;" @click="turnToPage(currentPage+2)" v-text="currentPage+2" v-if="currentPage+2<totalPage"></a></li>
<li><a href="javascript:;" @click="turnToPage(currentPage+3)" v-text="currentPage+3" v-if="currentPage+3<totalPage"></a></li>
<li :class="currentPage==totalPage?'disabled':''"><a href="javascript:;" @click="turnToPage(currentPage+1)" >下一页</a></li>
<li :class="currentPage==totalPage?'disabled':''"><a href="javascript:;" @click="turnToPage(totalPage)">尾页</a></li>
</ul>
<small class="small nowrap"> 当前第 <span class="text-primary" v-text="currentPage"></span> 页,共有 <span class="text-primary" v-text="totalPage"></span> 页</small>
<div class="go">
<div :class="isPageNumberError?'input-group error':'input-group'">
<input class="form-control" type="number" v-model="goToPage"><a href="javascript:;" class="input-group-addon" @click="turnToPage(goToPage)">Go</a>
</div>
</div>
</div>
</template>
<script type="text/javascript">
export default {
props: {
totalPage: {
type: Number,
default: 1,
required: true,
validator(value) {
return value >= 0
}
},
currentPage:{
type: Number,
default: 1,
validator(value) {
return value >= 0
}
},
changeCallback: {
type: Function,
default(cPage) {
console.log("默认回调,显示页码:" + cPage);
}
}
},
data(){
return {
myCurrentPage : 1,
isPageNumberError: false
}
},
computed:{
currentPage(){
return this.myCurrentPage;
}
},
methods:{
turnToPage( pageNum ){
var ts = this;
var pageNum = parseInt(pageNum);
if (!pageNum || pageNum > ts.totalPage || pageNum < 1) {
console.log('页码输入有误!');
ts.isPageNumberError = true;
return false;
}else{
ts.isPageNumberError = false;
}
ts.myCurrentPage = pageNum;
ts.changeCallback(pageNum);
}
}
}
</script>
<style type="text/css">
.pagination-wrap{
margin: 0 auto;
text-align: center;
}
.pagination {
display: inline-block;
padding-left: 0;
margin: 20px 0;
border-radius: 4px;
}
.small {
margin: 0 10px;
position: relative;
top: -32px;
}
.nowrap {
white-space: nowrap;
}
.input-group {
position: relative;
display: table;
border-collapse: separate;
}
.input-group-addon {
padding: 6px 12px;
font-size: 14px;
font-weight: 400;
line-height: 1;
color: #555;
text-align: center;
background-color: #eee;
border: 1px solid #ccc;
border-radius: 0 4px 4px 0;
}
.input-group-addon, .input-group-btn {
width: 1%;
white-space: nowrap;
vertical-align: middle;
}
.input-group-addon, .input-group-btn, .input-group .form-control {
box-sizing: border-box;
display: table-cell;
}
.input-group .form-control:first-child, .input-group-addon:first-child, .input-group-btn:first-child>.btn, .input-group-btn:first-child>.btn-group>.btn, .input-group-btn:first-child>.dropdown-toggle, .input-group-btn:last-child>.btn:not(:last-child):not(.dropdown-toggle), .input-group-btn:last-child>.btn-group:not(:last-child)>.btn {
border-top-right-radius: 0;
border-bottom-right-radius: 0;
}
.input-group-addon, .input-group-btn, .input-group .form-control {
display: table-cell;
}
.input-group .form-control {
position: relative;
z-index: 2;
float: left;
width: 100%;
margin-bottom: 0;
}
.go .error .form-control{
border: 1px solid #d95656;
}
.form-control {
display: block;
width: 100%;
height: 34px;
padding: 6px 12px;
font-size: 14px;
line-height: 1.42857143;
color: #555;
background-color: #fff;
background-image: none;
border: 1px solid #ccc;
border-radius: 4px;
-webkit-box-shadow: inset 0 1px 1px rgba(0,0,0,.075);
box-shadow: inset 0 1px 1px rgba(0,0,0,.075);
-webkit-transition: border-color ease-in-out .15s,-webkit-box-shadow ease-in-out .15s;
-o-transition: border-color ease-in-out .15s,box-shadow ease-in-out .15s;
transition: border-color ease-in-out .15s,box-shadow ease-in-out .15s;
}
.text-primary {
color: #428bca;
}
.pagination>li:first-child>a, .pagination>li:first-child>span {
margin-left: 0;
border-top-left-radius: 4px;
border-bottom-left-radius: 4px;
}
.go {
display: inline-block;
max-width: 140px;
top: -21px;
position: relative;
}
.input-group-addon:last-child {
display: table-cell;
text-decoration: none;
border-left: 0;
}
.pagination>.disabled>span, .pagination>.disabled>span:hover, .pagination>.disabled>span:focus, .pagination>.disabled>a, .pagination>.disabled>a:hover, .pagination>.disabled>a:focus {
color: #777;
cursor: not-allowed;
background-color: #fff;
border-color: #ddd;
}
.pagination>li:last-child>a, .pagination>li:last-child>span {
border-top-right-radius: 4px;
border-bottom-right-radius: 4px;
}
.pagination>.active>a, .pagination>.active>span, .pagination>.active>a:hover, .pagination>.active>span:hover, .pagination>.active>a:focus, .pagination>.active>span:focus {
z-index: 2;
color: #fff;
cursor: default;
background-color: #428bca;
border-color: #428bca;
}
.pagination>li>a, .pagination>li>span {
position: relative;
float: left;
padding: 6px 12px;
margin-left: -1px;
line-height: 1.42857143;
color: #428bca;
text-decoration: none;
background-color: #fff;
border: 1px solid #ddd;
}
.pagination>li {
display: inline;
}
</style>